Attending/Leaving Appointments
This section describes how to attend an appointment or leave an appointment that you are participating in.
Attending Appointments
Attend an appointment where you are not participating.
You cannot join a tentative appointment.
-
Click the app icon
 in the header.
 -
Click Scheduler.
-
On the "Scheduler" screen, click the title of the appointment you want to join.
-
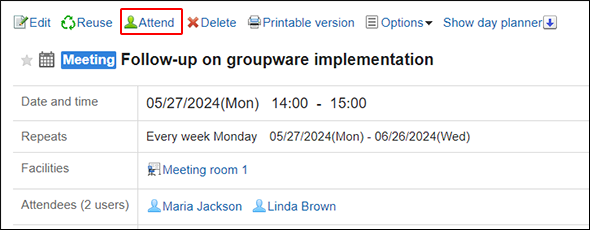
Click Attend on the "Appointment details" screen.
-
To attend repeating appointments, set the range of the appointments to attend in "Attend this appointment" screen.
- When you attend the appointment that you selected in Step 2:
Select the item for this appointment only (YYYY/MM/DD (Day of the week)). - When you attend repeating appointments on and after the date you specify:
Select the item for appointments after YYYY/MM/DD (Day of the week). - When you attend all repeating appointments:
Select all appointments.
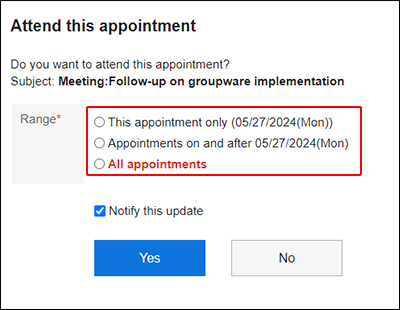
- When you attend the appointment that you selected in Step 2:
-
Select whether to notify other attendees and "Shared with" users that you are attending the appointment.
Clear the "Notify attendees of this appointment update" checkbox if you do not want to send notifications.
After February 2025 Update, a notification is sent to the appointment creator even if the checkbox is cleared. -
Confirm your settings and click Yes.
Leave Appointments
Leave the appointment.
You cannot leave the tentative appointment.
-
Click the app icon
in the header. -
Click Scheduler.
-
On the "Scheduler" screen, click the title of the appointment you want to leave.
-
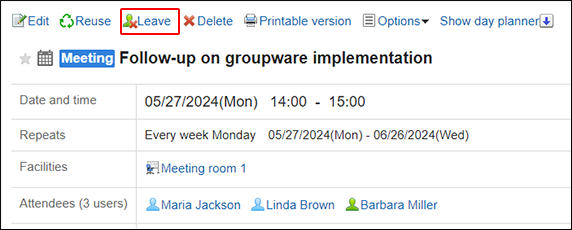
Click Leave on the appointment details screen.
-
To leave repeating appointments, set the range of the appointments to leave in "Leave appointments" screen.
- When you leave the appointment that you selected in Step 2:
Select the item for this appointment only (YYYY/MM/DD (Day of the week)). - When you want to leave repeating appointments on and after the date you specify:
Select the item for appointments after YYYY/MM/DD (Day of the week). - When you want to leave all repeating appointments:
Select all appointments.
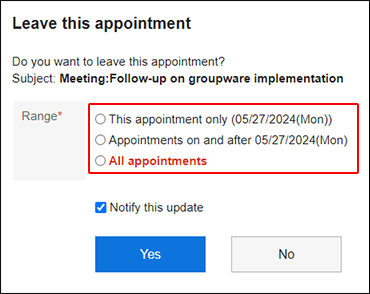
- When you leave the appointment that you selected in Step 2:
-
Select whether to notify other attendees and "Shared with" users that you are leaving the appointment.
Clear the "Notify attendees of this appointment update" checkbox if you do not want to send notifications.
After February 2025 Update, a notification is sent to the appointment creator even if the checkbox is cleared. -
Confirm your settings and click Yes.