Arrange appointments
From the availability of users and facilities, you can select a convenient date and time and add an appointment. You can select multiple dates and times.
If the date is not fixed, you can add multiple candidate dates as "tentative appointments".
Arrange appointments using one of the following methods.
- Adding appointments while checking availabilities
- Search for availabilities to add appointments
Adding Appointments While Checking Availabilities
You can display the schedules of users and facilities you want to confirm, and add an appointment by selecting a convenient date and time.
-
Click the app icon
 in the header.
 -
Click Scheduler.
-
On the "Scheduler" screen, click Arrange appointments.
-
On the "Arrange appointments" screen, click Change users/facilities.
-
In the "User" field on the "Select users/facilities" dialog, add users whose availability you want to check.
Up to first 10 users (out of those you added) can be displayed on the screen to check their availabilities. If you add 11 users or more, you cannot view the availabilities of all users, but all users are added as attendees of the appointment. -
If you want to check the availability of the facilities, click Add facilities under the "Facilities" field.
-
Add facilities to configure usage and duration and check their availabilities.
You can add up to 10 facilities.
- Usage of selected facilities:
Select whether to use only one of the facilities, or use all facilities. - Duration:
Configure the duration of an appointment.
- Usage of selected facilities:
-
Click Apply.
-
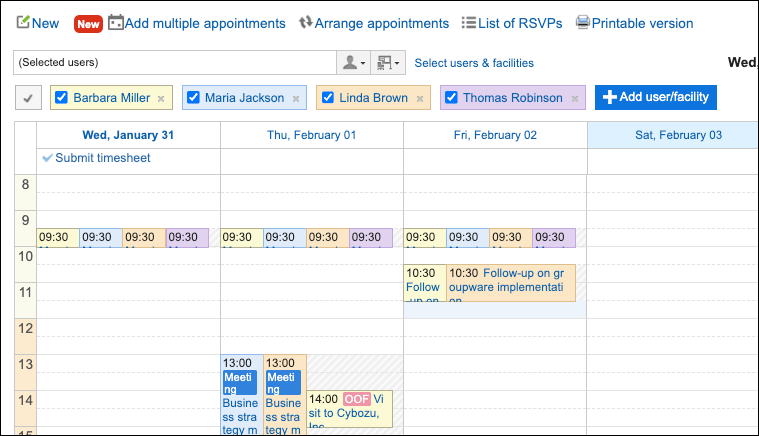
On the "Arrange appointments" screen, check availabilities.
The blank slots with no appointments for added users and facilities are available hours.
The appointments of users are color-coded. You can show or hide the appointments of specific user using the checkbox next to the user name.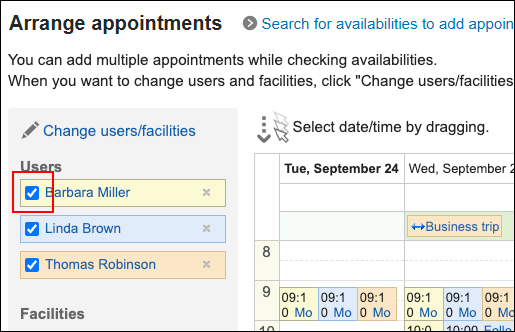
-
Select a time slot to add an appointment by dragging it.
You can select up to 10 appointments with the 30-minute unit. If you added facilities, select the same duration you configured in Step 7.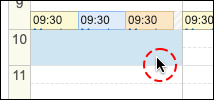 The dates/times you dragged to select are added to "Selected dates/times".
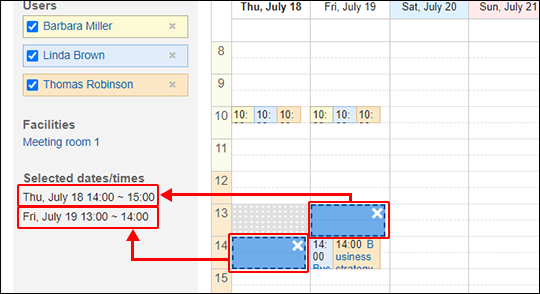
-
Click Enter appointment details.
-
In the "Enter appointment details" dialog, configure necessary fields.
- Title:
Enter a subject of the appointment. - Shared with:
Select "Shared with" users of an appointment. - Company information:
Enter company details such as company name and address. - Notes:
Enter notes for the appointment. - Visibility:
Select whether to make the appointment public. - Tentative appointments:
To add appointments as tentative appointments, select the "Add as tentative appointments" check box.
To change the settings, click Cancel.
- Title:
-
Confirm your settings and click Add.
If you add appointments as tentative appointments, select one of them later to fix the appointment. Refer to the steps in Finalizing Tentative Appointments.
Also, you can copy a list of Candidate dates and times. Click Copy candidate dates and times in the "Appointment Details" screen, and click Copy. This is useful to notify other users of the candidate dates and times.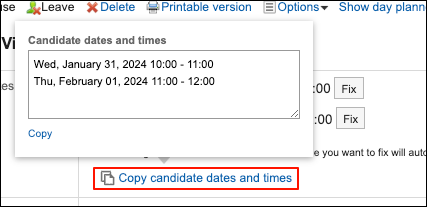
Searching for Availabilities to Add Appointments
You can set conditions such as attendee, facility, and duration of an appointment, and search the available time based on those conditions.
You can add an appointment to the most convenient date and time in the search results.
-
Click the app icon
in the header. -
Click Scheduler.
-
On the "Scheduler" screen, click Arrange appointments.

-
Click Search for availabilities to add appointments in the "Arrange appointments" screen.
-
On the "Search for availabilities (Attendees and facilities)" screen, select attendees and facilities and click Enter requirements.
You can also select users and facilities who are allowed to view the appointment by the system administrator. -
On the "Search for availabilities (Candidate dates/times and facility requirements)" screen, set the required items and click Find available times.
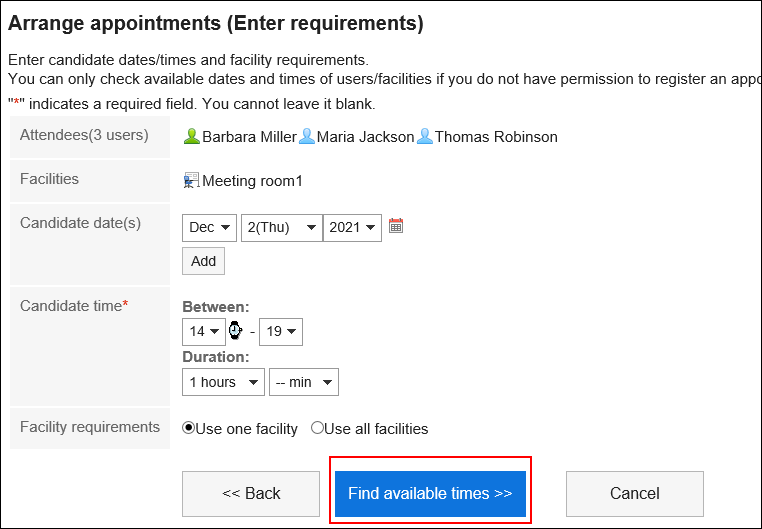
- Date Suggestions:
Select the candidates of dates for the appointment. You can set up to five suggestions. - Time Suggestions:
Set the time period and the duration of the appointment for availability search. - Facility conditions:
Select whether to use only one of the facilities selected in step 4, or use all facilities.
- Date Suggestions:
-
On the "Search Results" screen, set the required items.
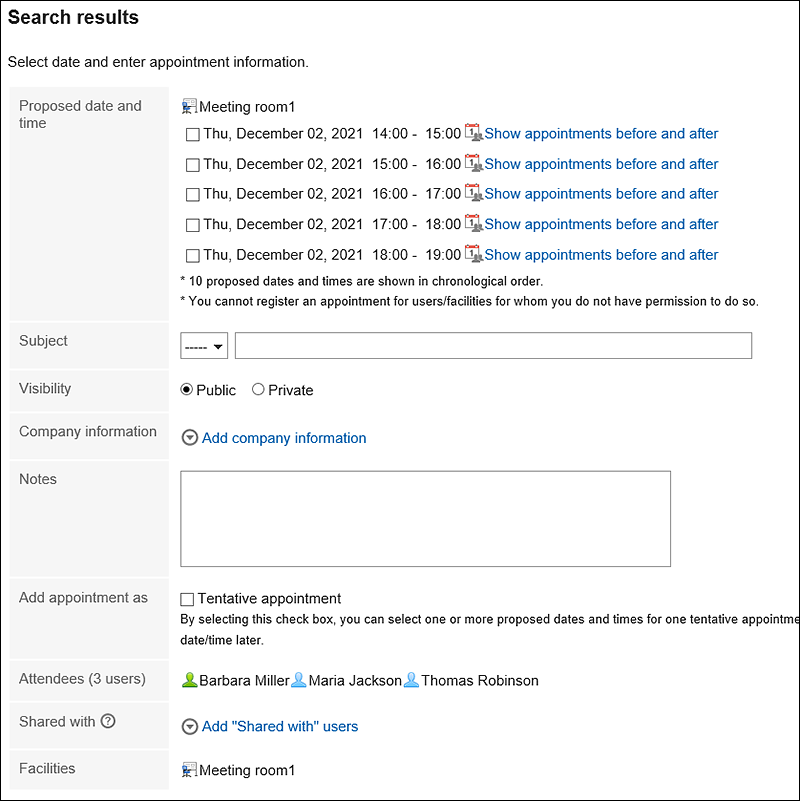
- Date and time suggestions:
Select the date and time you want to add an appointment. Clicking Show appointments before and after displays the appointments planned before and after the specified time for attendees and facilities selected in step 4. - Title:
Set the title of the appointment. - Visibility:
Select whether to make the appointment public. - Company information:
You can add company information, such as destinations for visiting and a business trip. - How to add:
To add appointments as tentative appointments, select the "Add as tentative appointments" check box. - Shared with:
If you want to share your appointments with users other than attendees, click Add to set "Shared with" users.
To change the conditions again, click "Back to Previous Page".
- Date and time suggestions:
-
Confirm your settings and click Add.
If you add appointments as tentative appointments, select one of them later to fix the appointment. Refer to the steps in Finalizing Tentative Appointments.
Also, you can copy a list of Candidate dates and times. Click Copy candidate dates and times in the "Appointment Details" screen, and click Copy. This is useful to notify other users of the candidate dates and times.
Finalizing Tentative Appointments
If the schedule is fixed, fix the date and time of the tentative appointment.
You can fix the appointment by selecting one of the tentative appointments that you have added.
-
Click the app icon
in the header. -
Click Scheduler.
-
On the "Scheduler" screen, click the title of the tentative appointment.
The title of the tentative appointment is displayed in green characters.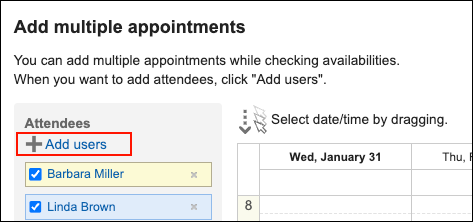
-
On the "Appointment details" screen, click Fix for the date and time you want to fix.
When the appointment is fixed, it will be applied to the Scheduler of all attendees.
Candidate dates/times other than the fixed one are automatically deleted.