Setting Up User Permissions
You can set which applications are available to users in KUNAI for each organization, user, or role.
For example, you can allow a department manager who frequently has business trips to process requests from KUNAI, or prohibit the use of e-mails in KUNAI to reduce the workload on Garoon.
By default, all users can use all applications in KUNAI.
Adding Permissions
Add permissions for applications to use KUNAI.
-
Click the Administration menu icon (gear icon) in the header.
The gear-shaped icon appears only on the screen for the users with administrative privileges. -
Click Garoon System Administration.
-
Select "Application settings" tab.
-
Click KUNAI.
-
Click User Permissions.
-
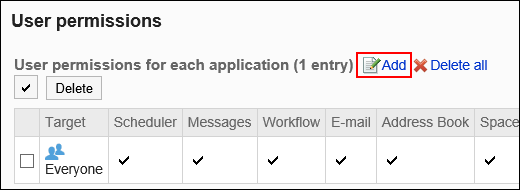
On the "User Permissions" screen, click Add.

-
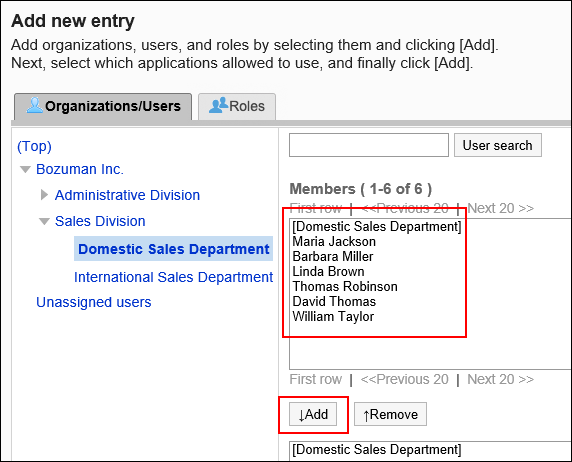
On the screen to add targets, select the organization, user, or role to set permissions, and click Add.
To select a role, switch the view to the "Roles" tab.
When you switch tabs after clicking Add, the selected organizations, users, or roles are cleared before you switch.
-
Select the checkbox of applications to allow to use in KUNAI.
Users cannot change the setting of the inactive applications. For details, refer to the "Using Applications" section.
-
Confirm your settings and click Add.
Permission That Takes Priority When More Than One Permissions Are Applied
When permissions are set for organizations, users, and roles, multiple privileges may be set for one user. In this case, the permission allowing the use of applications overrides.
For example, if you set the following permissions, a user, Osamu Kimura who belong to "Domestic Sales Department" department and "Department manager" role can use schedulers, messages, and workflows.
| Target | Scheduler | Messages | Workflow |
|---|---|---|---|
| Domestic Sales Department | |||
| Department manager | |||
| Osamu Kimura |
Changing Permissions
Change applications to which you allow organizations, users, or roles to use in KUNAI that you set permissions.
-
Click the Administration menu icon (gear icon) in the header.
The gear-shaped icon appears only on the screen for the users with administrative privileges. -
Click Garoon System Administration.
-
Select "Application settings" tab.
-
Click KUNAI.
-
Click User Permissions.
-
On "User Permissions" screen, click Change for organizations, users, or roles to change the permissions.

-
On the screen to change user permissions, select the checkboxes for the applications to allow users to use in KUNAI.
If you prohibit user to use applications, clear the checkboxes. -
Confirm your settings and click Save.
Deleting Permissions
Delete permissions for applications using KUNAI.
Users who have been deleted the permission will not be able to use Garoon applications via KUNAI.
Selecting and Deleting Permissions
You can select permissions and delete them.
-
Click the Administration menu icon (gear icon) in the header.
The gear-shaped icon appears only on the screen for the users with administrative privileges. -
Click Garoon System Administration.
-
Select "Application settings" tab.
-
Click KUNAI.
-
Click User Permissions.
-
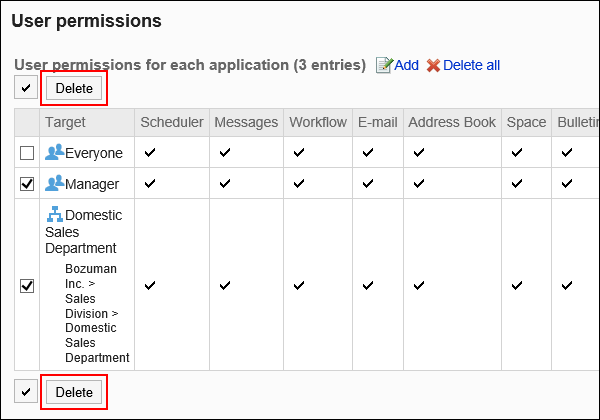
On "User Permissions" screen, select the checkboxes for the organizations, users, or roles to delete, and then click Delete.

-
Click Yes on the delete targets screen.
Deleting All Permissions
You can delete all permissions.
-
Click the Administration menu icon (gear icon) in the header.
The gear-shaped icon appears only on the screen for the users with administrative privileges. -
Click Garoon System Administration.
-
Click the Application Administration tab.
-
Click KUNAI.
-
Click User Permissions.
-
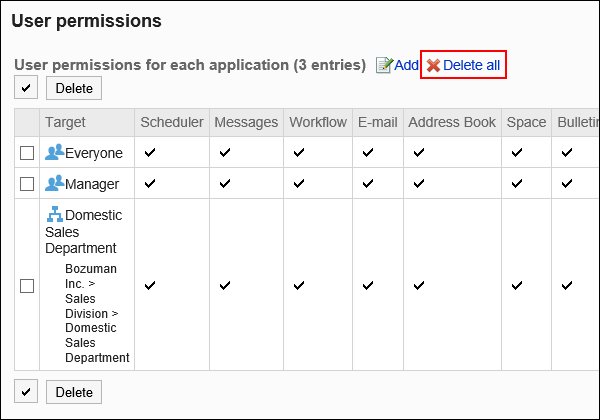
On the "User Permissions" screen, click Delete all.

-
Click Yes on the delete all targets screen.