View the timesheet of each user
You can view and modify the timesheet of each user.
The time is displayed in the format of the time that is specified in the locale settings of each user.
The time zone that is set in the user information is applied to the date and time that is used in the timesheet settings.
The Time field on the user's timesheet can display the IP address of the user where the time is punch.

IP addresses can be recorded as follows
- When the time is punch to the timesheet
- When one of the following buttons is clicked in the "timesheet" screen of the user or the "Timesheet" portlet
- In
- End
- Out
- In
- When the timesheet is fixed
Fixing the Timesheet
You can modify the time and notes that are punch to the timesheet of the selected users.
The system administrator or application administrator can modify the time of the user's timesheet, regardless of whether or not the user is allowed to modify the time.
The recorded IP address cannot be edited.
-
Click the Administration menu icon (gear icon) in the header.
The gear-shaped icon appears only on the screen for the users with administrative privileges. -
Click Garoon System Administration.
-
Select "Application settings" tab.
-
Click Timesheet.
-
Click "Timesheet List".
-
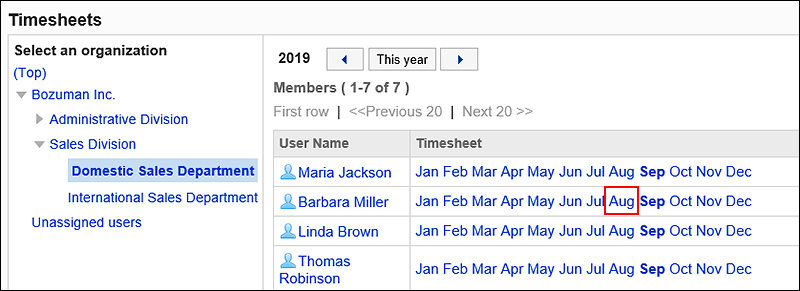
On the "Timesheet list" screen, select an organization and click the Month.

-
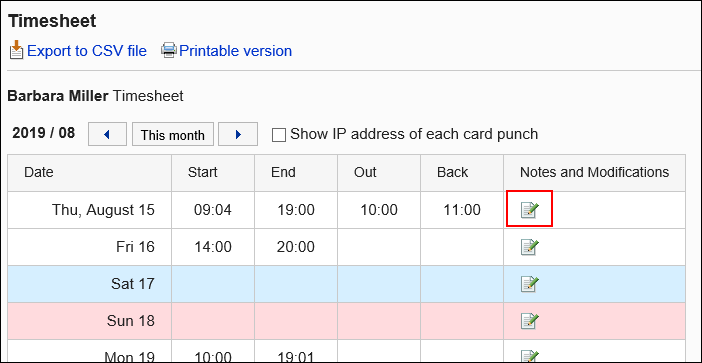
On the "Timesheet" screen, click the
 icon in the "Notes and corrections" field.
-
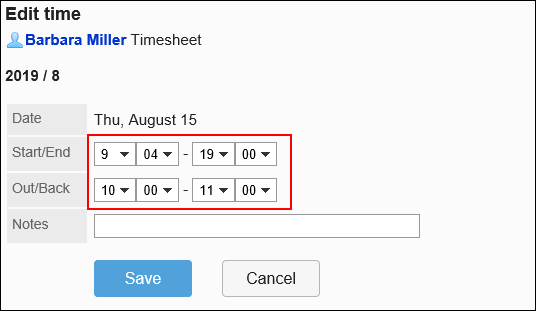
On the "Fix time" screen, modify the timesheet.

-
Confirm the details and click "Edit".
Print Timesheet
Prints the timesheet for the selected user.
-
Click the Administration menu icon (gear icon) in the header.
The gear-shaped icon appears only on the screen for the users with administrative privileges. -
Click Garoon System Administration.
-
Select "Application settings" tab.
-
Click Timesheet.
-
Click "Timesheet List".
-
On the "Timesheet list" screen, select an organization and click the Month.

-
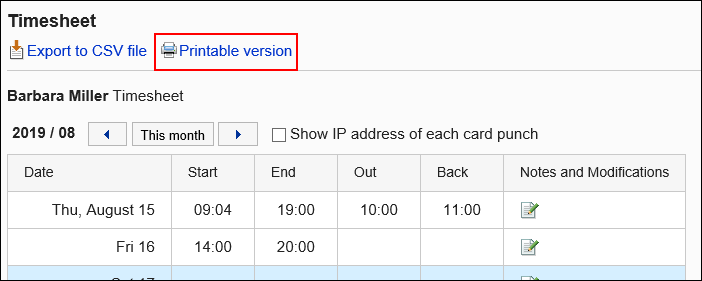
On the "Timesheet" screen, click "Print Screen".

-
On the print settings screen, set the required items.
- Character Size:
Select the text size you want to print. - Locale:
Set the format for displaying date and time.
Select either of the locale for the user or the locale for printing.
For details on locales, refer to how to set the locale for printing. - Punch Information Display
Determines whether to print the IP address of the user where the time is recorded in the timesheet.
To print IP addresses, select the "Show IP addresses" checkbox.
- Character Size:
-
Click "Print" to print the timesheet using the print feature of the Web browser.