Auto add to Scheduler
The contents of the approved request data can be added to the scheduler automatically.
For example, if a vacation or a travel request is approved, the appointment is automatically added to the schedule and other members can confirm the appointment.
To set up auto-enrollment to scheduler, you must set the "Date" field in the Request form.
You can add a regular or a period of public appointment of the date entered in the "Dates" field of the request data.
| Workflow | Scheduler | ||
|---|---|---|---|
| Subject field | -> | Subject | |
| Appointment type | -> | Appointment type | |
| Start and end date and time | -> | Date and time | |
| URL on the "Request Details" screen | -> | Memo | |
| Applicant | -> | Attendees, registrants, and updated | |
| Last approved date and time | -> | Date/Time create and updated1 | |
-
Click the Administration menu icon (gear icon) in the header.
The gear-shaped icon appears only on the screen for the users with administrative privileges. -
Click Garoon System Administration.
-
Select "Application settings" tab.
-
Click Workflow.
-
Click Request forms.
-
On the "Request forms" list screen, select a category, and then click the name of the request form for which you want to set auto-add to Scheduler.
-
On the "Request form details" screen, select Set auto add to Scheduler in the "Request form items" section.
If the "Date" field is not set, the "Set auto Add to Scheduler" Action link is disabled.
If the scheduler is inactive, the action links are not displayed.
-
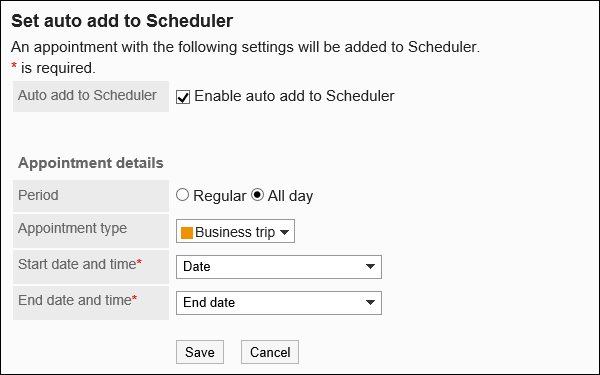
On the "Set auto add to Scheduler" page, select the "Enable auto add to Scheduler" checkbox,

-
Set the "contents of the appointment to be added" field.
The setting fields are as follows:
- Type of Appointment
Select either a regular appointment or an all day appointment. - Appointment Type
Select the appointment type that you want to display in the title of the appointment.
For details, refer to Setting up Appointment Types. - Start date and time
Select the "Date" field in the request form, which is set as the start date of the regular appointment, or the start date of the period appointment. - End Date and time:
Select the "Date" field in the request form that you want to set as the end date and end date of the regular appointment.
- Type of Appointment
-
Confirm your settings and click Save.
The following message appears on the "Request details" screen of the applicant. By clicking Check the appointment, the "Appointment details" screen will be displayed.
The following message appears on the "Request Details" screen of the applicant
The following are the primary reasons for the automatic registration of scheduler to fail:
- The start date and end date and time settings are incorrect.
- The date and time specified in the "Day" field of the request data are invalid.
- The applicant has been deleted or is set to be deleted by the user.
- The applicant is not allowed to use the scheduler.
- The scheduler is set to the inactive application.
- In the request form, only an acknowledgment route is configured as a request route.
- The route branching configured in the request form made the approval route to be skipped, which then created the request data with a "acknowledgment only" request route.