Setting Up a Basic Workflow with Process Management
This article covers how to set up a workflow for an app using the Process Management feature.
Setting up a basic workflow with process management
In this section you will learn how to create a basic workflow in the Process management settings.
To create the workflow, the following settings need to be configured on the Process management settings screen.
- Status before taking action
- Assignee list
- Conditions to take this action
- Action name
- Status after action taken
You may want to organize your workflow visually (e.g., with a chart or map) beforehand to make setup easier.
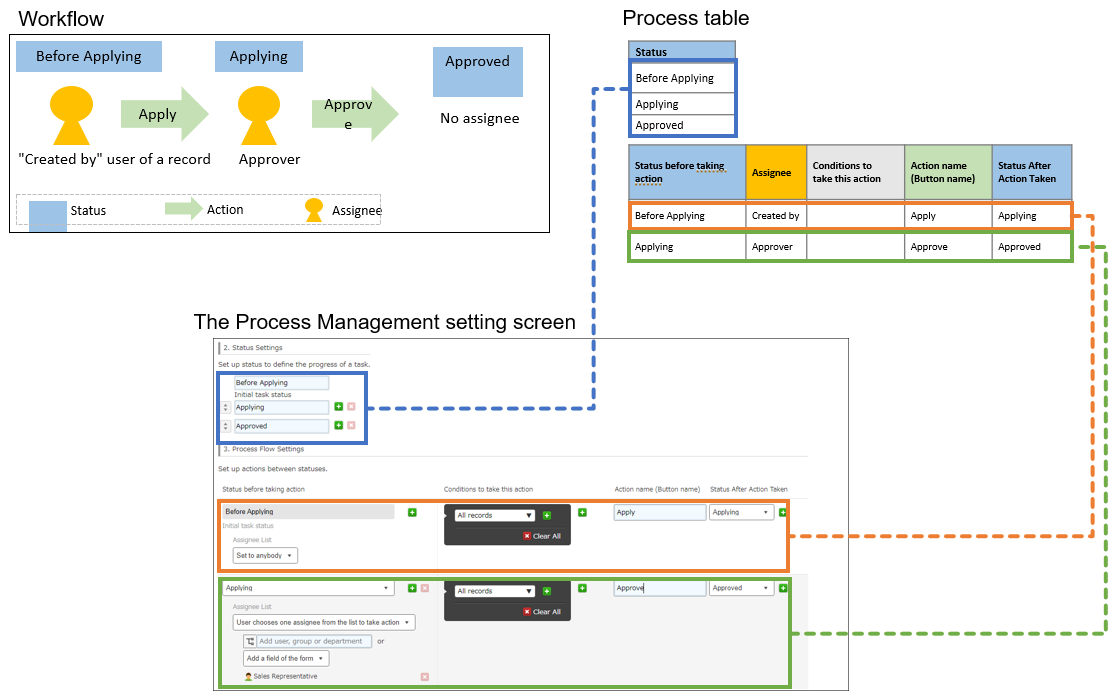
In the example below, we will configure the process management settings to create a workflow for a purchase request app.
This workflow will require an assigned approver to confirm and approve purchase request records created by users.
Steps
-
Click the App settings icon (the gear-shaped icon) at the upper right of the View screen.

-
On the App settings screen, select the App settings tab, then click Process management under General settings.
-
In the 1. Enable this feature section of the Process management screen, select the Enable process management checkbox.
Default values are set in the 2. Status settings and 3. Process flow settings sections as examples.
The settings of each section are reflected in the diagram under Process flow diagram.

-
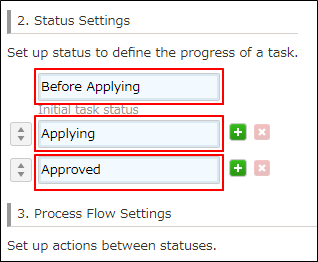
Configure the settings in the 2. Status settings section.
The status of a record indicates which step of the workflow the record is currently on.
The following three statuses are set in advance: "Not started", "In progress", and "Completed". You can change the names of statuses, add new ones, or delete ones that you don't need.
In this example, we will change the names of the three statuses to "Before Applying", "Applying", and "Approved", respectively.
-
Configure the settings in the 3. Process flow settings section.
Before configuring these settings, you may want to organize your work process in table form to make it easier to visualize the workflow.
Reference: Designing process management
In this example, we will configure the settings based on the process table below.
The first status in the Status before taking action section is automatically set to the initial status you have set in Step 4. In this example, "Before Applying" is automatically set as the first status.Status before
taking actionAssignee list Conditions to
take this actionAction name
(Button name)Status after
action takenBefore Applying Created by Apply Applying Applying Approver Approve Approved 
-
Set up Assignee list.
"Assignee" refers to the user who is assigned to carry out an action that will move a record's workflow status forward.
About assignees
For the first status, you can set the assignee either as Created by, which makes the user who created the record the assignee, or as Set to anybody.
In this example, we will select Created by.

-
Set up Conditions to take this action.
By configuring these settings, you can create a workflow with branching criteria.
Setting up process management workflows with branching criteria
In this example, we will leave All records selected.

-
Set up Action name (Button name).
Here you can set the name of the button for performing the relevant action in the workflow. The button will appear on assignees' screens.
In this example, we will enter "Apply".

-
Set up Status after action taken.
When the action is performed, the status changes from the one you have set in the Status before taking action section to the one set here.
You can select a status from the statuses set in Step 4. In this example, we will select "Applying".
 You have successfully set up the first portion of the workflow, from the first status to the next one (from "Before Applying" to "Apply").

-
Set up the rest of the workflow in the same manner.
For this example, we will set up the workflow from the "Apply" status to the "Applied" status as described below.
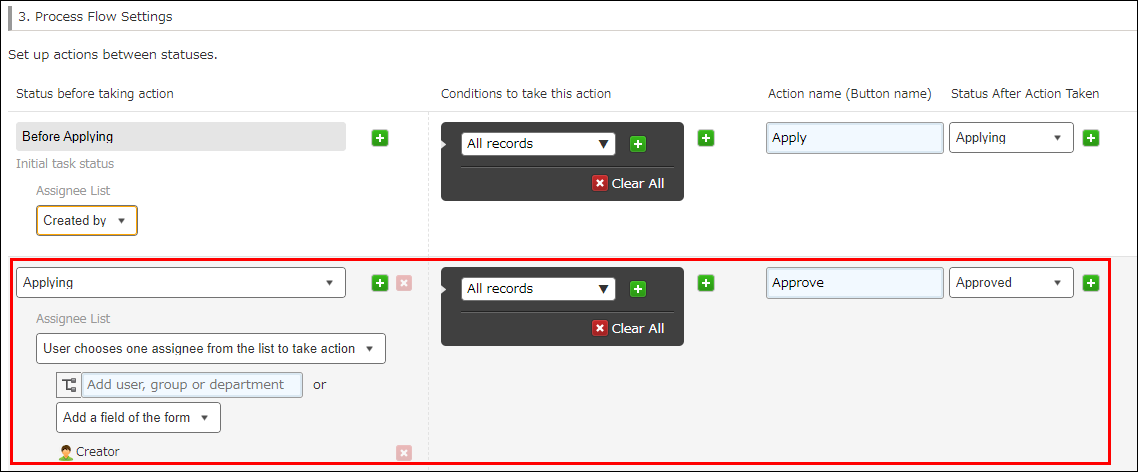
- Status before taking action:
Select "Applying". - Assignee list:
With User chooses one assignee from the list to take action selected, click Add a field of the form and select "Approver". - Conditions to take this action:
Leave All records selected. - Action name (Button name):
Enter "Approve". - Status after action taken:
Select "Approved".
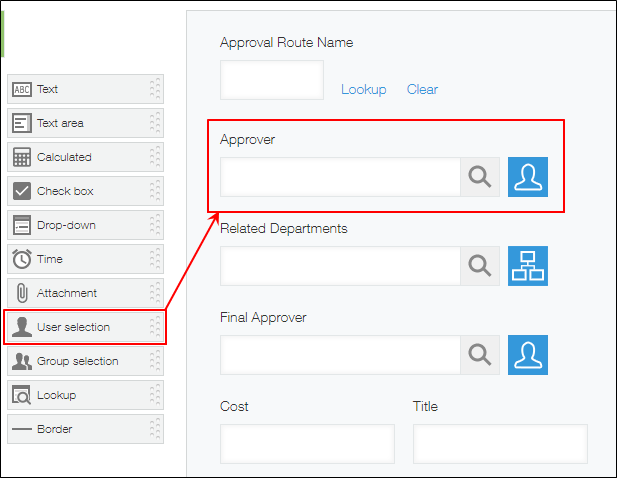
To select "Approver" as an assignee as in the example above, you first have to add a User selection field on the app form and name the field "Approver".
You have successfully configured the settings for the "Applying" status.
Note that you don't need to configure the settings for the last status (in this example, "Approved"). - Status before taking action:
-
Check the diagram under Process flow diagram at the top of the screen to make sure that your process is set up as you intended.

-
Click Save at the bottom right of the screen.
-
On the App settings screen, click Update app.
-
On the Update app dialog, click Update app.
This completes the process management setup.
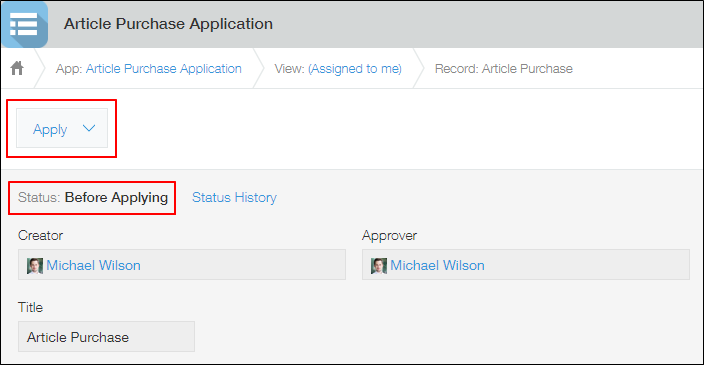
When you add and save a record in the app, the first status in the workflow and the button (action) to move the status forward are displayed on the Record details screen.
About assignees
"Assignee" refers to the user who is assigned to carry out an action that will move a record's workflow status forward.
When an assignee is set for an action, the button to perform it will be displayed only on the assignee's Record details screen. The button will not be displayed for users who are not assignees.
If no assignee is set for an action, the button to perform it is displayed for all users.
How to set assignees
Assignees can be set for each status.
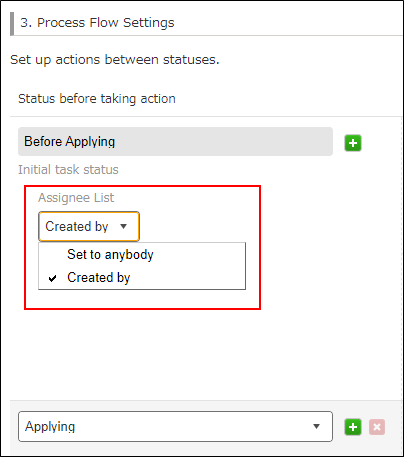
For the first status, set the assignee either as Created by, which makes the user who created the record the assignee, or as Set to anybody.
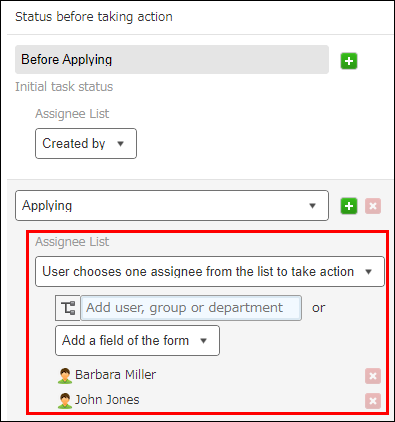
For the second status and subsequent statuses, you can set assignees by directly entering a user name or department name, or by selecting a field from the Add a field of the form drop-down list.
Different methods for specifying assignees
If you want to set multiple users or departments as assignees, select one of the following options from the drop-down menu under Assignee list.
- User chooses one assignee from the list to take action
- All assignees in the list must take action
- One assignee in the list must take action
The option you select will determine how the assignee is designated and when the workflow status will change.
If you select "User chooses one assignee from the list to take action"
- How the assignee is designated:
Users added to Assignee list in the Process management settings are candidates to become the assignee. The assignee of the previous status selects one user among the candidates to be the assignee for the next status. - When the status will change:
When the user designated as the assignee performs the relevant action, the status changes.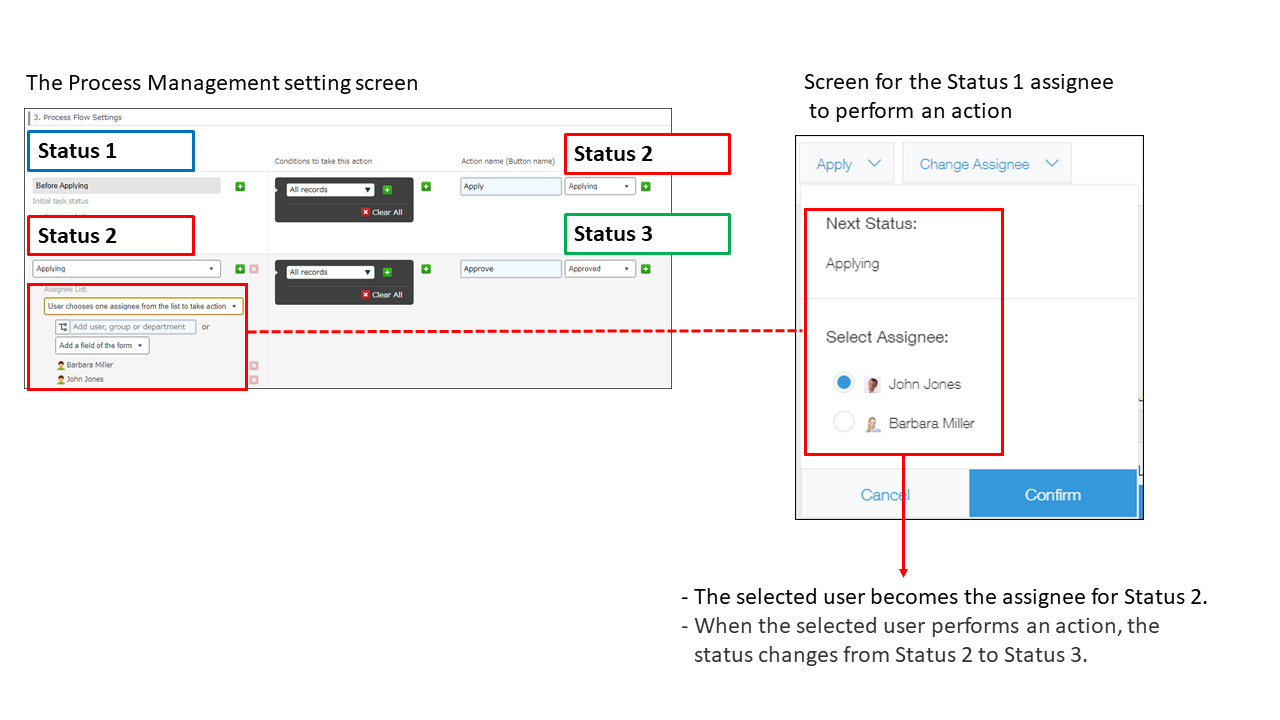
If you select "All assignees in the list must take action"
- How the assignee is designated:
All users added to Assignee list in the Process management settings become the assignees. - When the status will change:
When all the assignees perform the relevant action, the status changes.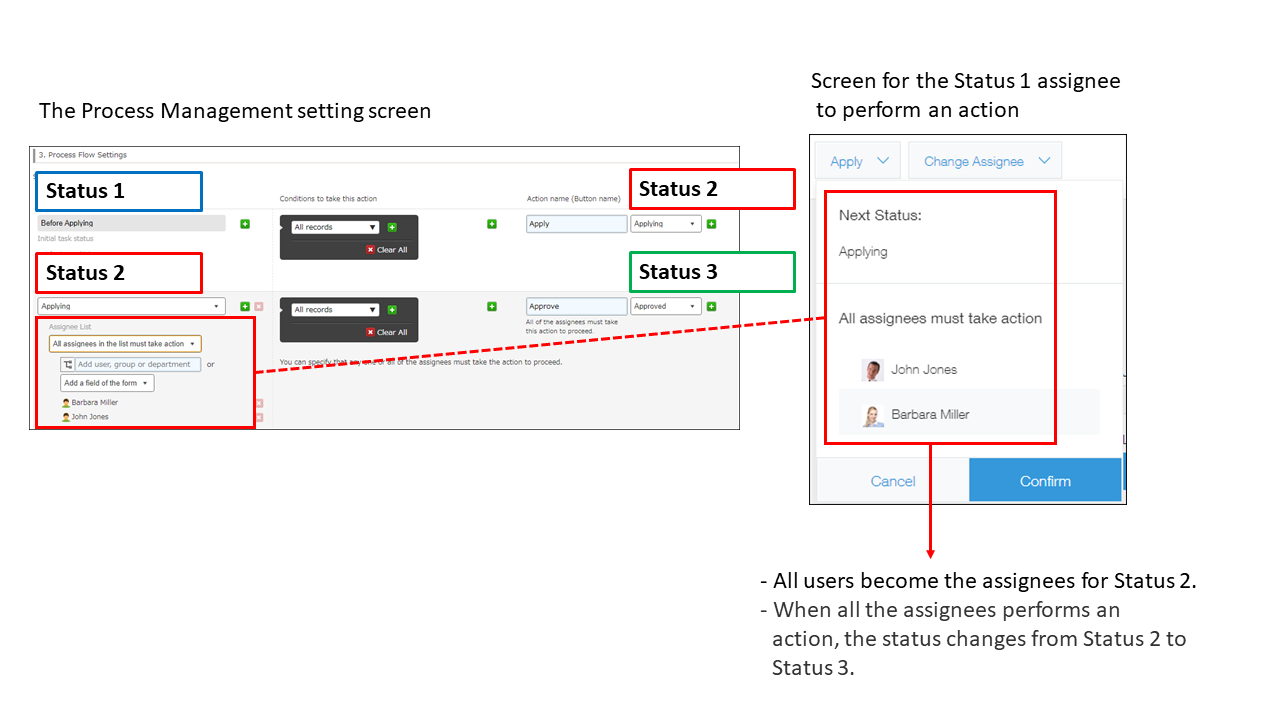
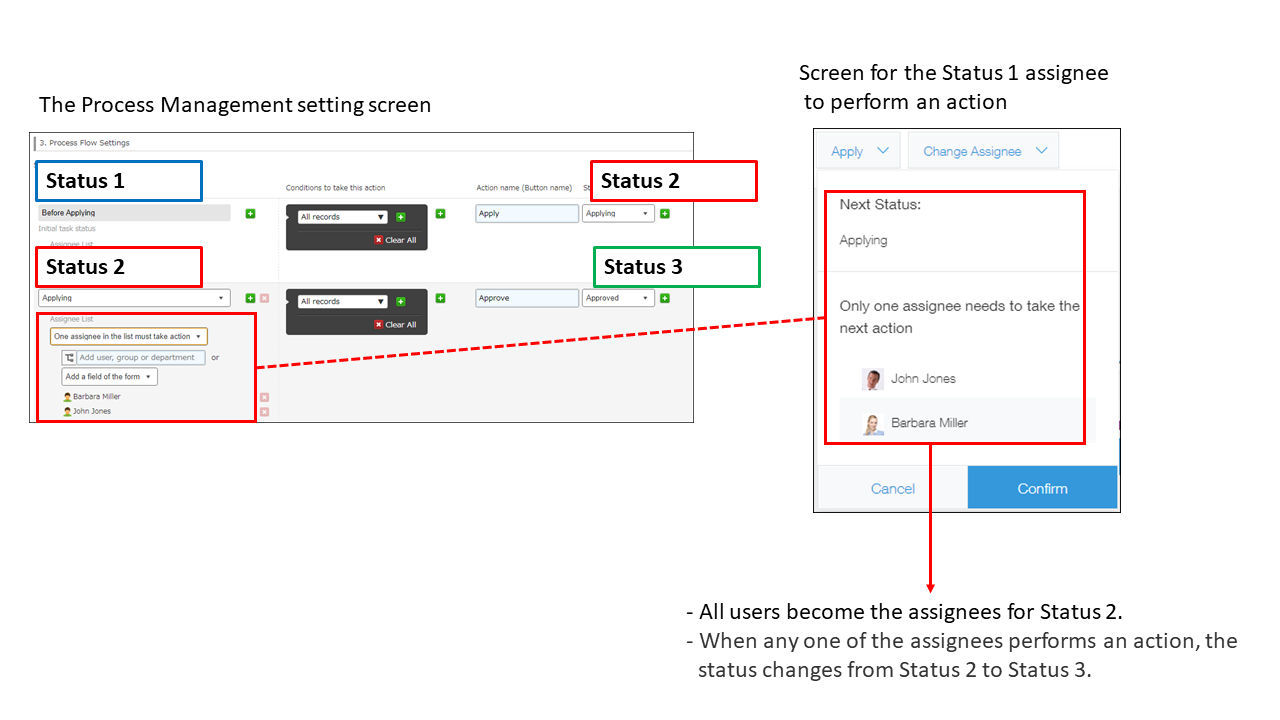
If you select "One assignee in the list must take action"
- How the assignee is designated:
All users added to Assignee list in the Process management settings become the assignees. - When the status will change:
When any one of the assignees performs the relevant action, the status changes.
Setting up process management workflows with branching criteria
You can direct your workflow to move to different actions based on the values entered in the fields that you specify in the Process management settings.
For example, you can configure the settings in such a way that if the value entered in the "Cost" field is $10,000 or more, approval is required, and if not, approval is skipped.
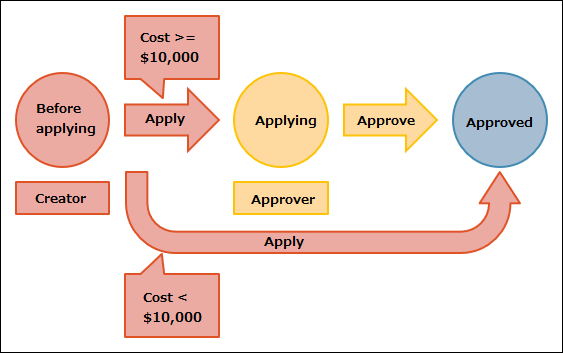
To direct your workflow to move to different actions, configure the settings in the Conditions to take this action section.
For an example of how you can configure the settings, see below.
-
Statuses:
Before Applying, Applying, and Approved -
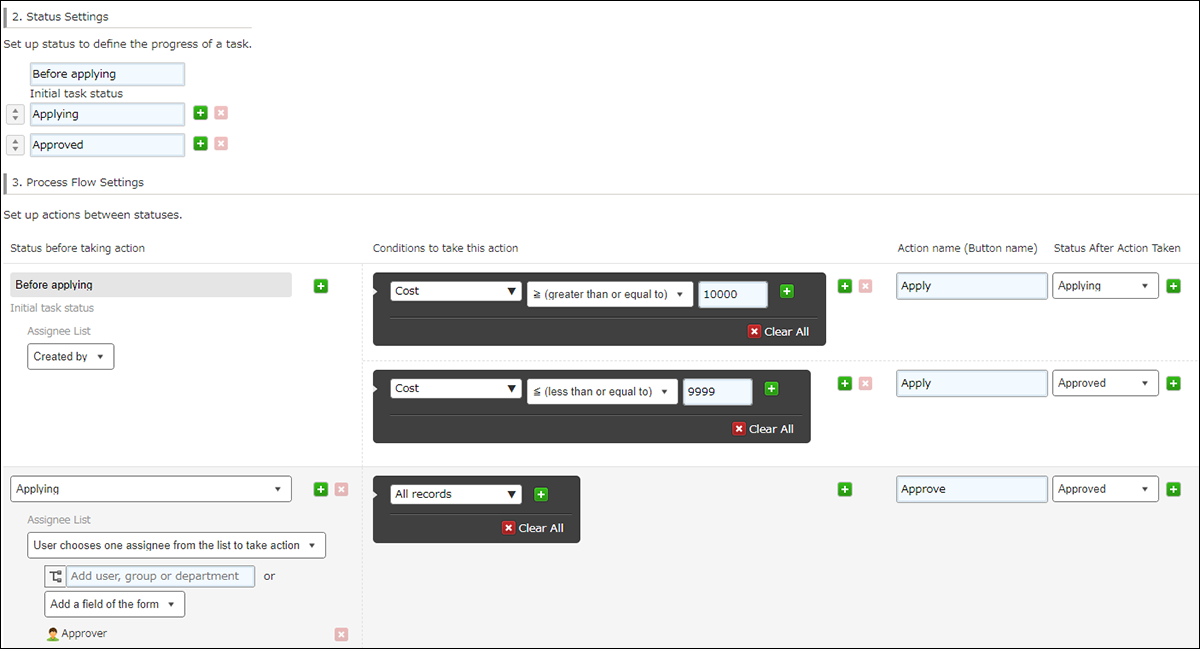
Process Table 1:
Add a Number field (field name: "Cost") and a User selection field (field name: "Approver") on the app form beforehand.Status before
taking actionAssignee list Conditions to take this action Action name
(Button name)Status after
action takenBefore Applying Created by The value entered in the "Cost" field is 10000 or more Apply Applying The value entered in the "Cost" field is 9999 or less Apply Approved Applying Approver Approve Approved The screen on which the settings are configured in accordance with Process Table 1:
Note that if you specify conditions in the Conditions to take this action section, the button to perform the action is not displayed for assignees until the specified condition is met.
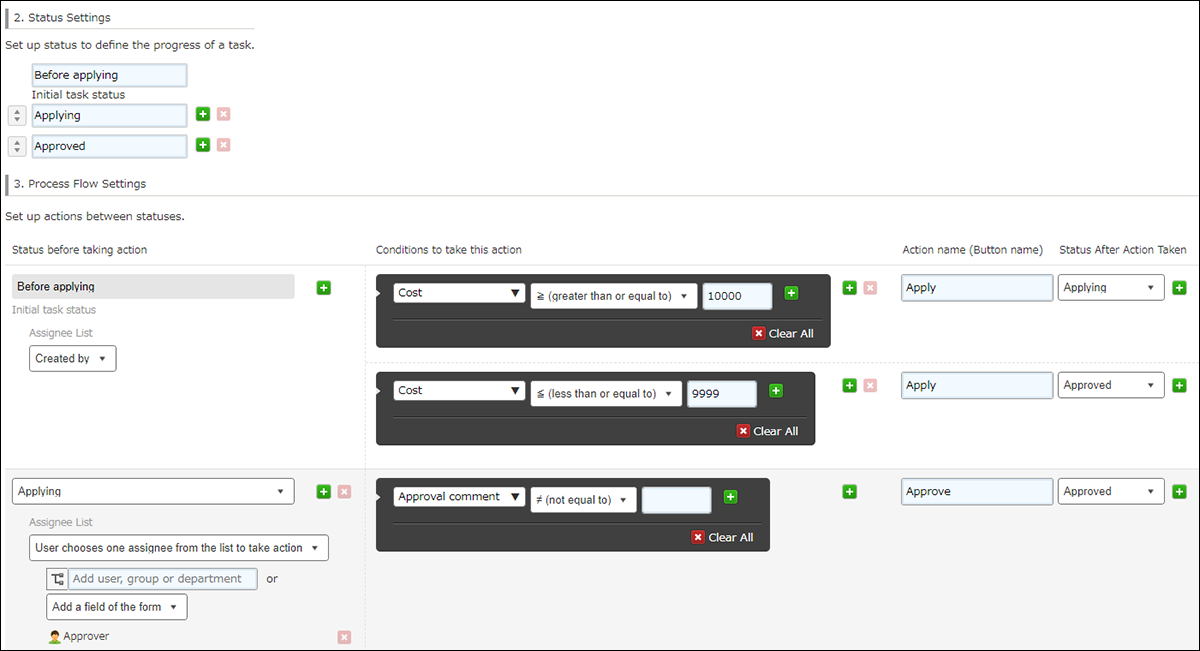
For example, in the case where the settings are configured in accordance with the process table shown below, the "Approve" button is not displayed for the approver until the approval comment is entered, even when the status is "Applying".
-
Process Table 2:
Add a Number field (field name: "Cost"), a User selection field (field name: "Approver"), and a Text field (field name: "Approval comment") on the app form beforehand.Status before
taking actionAssignee list Conditions to take this action Action name
(Button name)Status after
action takenBefore Applying Created by The value entered in the "Cost" field is 10000 or more Apply Applying The value entered in the "Cost" field is 9999 or less Apply Approved Applying Approver The "Approval comment" field is filled out (not left blank) Approve Approved The screen on which the settings are configured in accordance with Process Table 2:
FAQ
Is it possible to revert a status back to the previous one?
No, statuses cannot be reverted.
As a workaround, an app administrator can add an action for changing a status back to the previous one in the Process management settings. After doing so, the app administrator should do the following.
- Set themselves as the current assignee and perform the set action.
- Ask the user designated as the current assignee to perform the set action.
Is it possible to change the status of multiple records at once?
No, the status of multiple records cannot be changed at once.
You need to open and change the status of each record one by one.
For your reference, if you use a Drop-down field to enter the status of records instead of using process management, you can change the status of multiple records at once by using the CSV import/export feature.
When multiple assignees are specified in the process management settings, how will the current assignees be displayed on the "Record details" screen?
When multiple assignees are set in the Process management settings of an app for which process management is enabled, the current assignees are displayed at the top of the Record details screen in the following format: "Assigned to: (User Name) and N more".
Example: "Assigned to: John Jones and 4 more"
The screen displays the user name of the assignee with the smallest user ID among all the assignees ("John Jones" in the example above). The display order setting does not affect which user's user name is displayed.
Clicking "and N more" displays the list of assignees in ascending order of their user IDs.
Note: User IDs can be found in the "editUser?id=user ID" part of the URL for the "Change User Information" screen in Users & system administration.
I added users to a group or department specified under "Assignee list", but they are not reflected under "Assigned to"
The current assignees that appear under Assigned to: on a record are designated according to the department/group/user settings that were in place at the time when the action to change the previous status was performed.
For this reason, if you change the users of a department/group that is set as a process management assignee after the department/group has already become the current assignee of a record, the changes will not be automatically reflected on that record and the current assignees will remain the same as before you made the change.
If you have permission to manage the app, you can manually add a user as a current assignee of the record.
The steps are as follows.
- Open the record to which you want to add an assignee.
- Click the Change assignee action button on the Record details screen.
- Add the user you want to add as an assignee and click Assign.
