Designing Process Management
Configuring your process management settings can get a little complicated.
To make setup go smoothly, it is recommended that you have a good understanding of your workflow and design your process management before setting it up in kintone.
Try visualizing the workflow you want to set up process management for by writing it out on paper or using an application like PowerPoint or Excel.
As an example, the following image shows a visualization of an application-to-approval workflow.

Workflow
When you visualize your workflow, make sure that statuses, assignees, and actions can be easily differentiated.
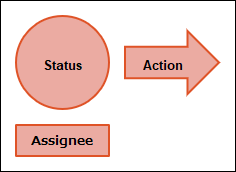 In the example above, statuses are represented by circles, assignees by rectangles, and actions by arrows.
-
Specify the initial status.
Make the initial assignee either unspecified or the user who created the record.
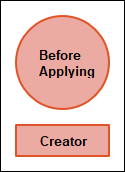 In the example above, the initial status is "Before Applying" and the assignee is "Creator".
 -
Specify the next status and the next assignee.
Specify a button name (action) to use to move to the next status.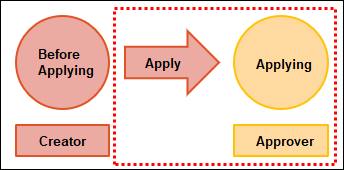 In the example above, the action is "Apply", the next status is "Applying", and the next assignee is "Approver".
 -
Repeat step 2 as many times as necessary.
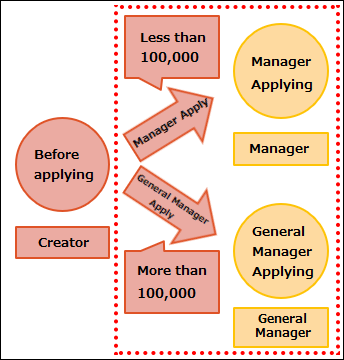
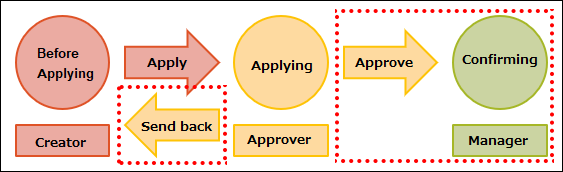 If the next status and the next assignee vary depending on certain conditions, specify the necessary conditions.
-
Specify the last (completed) status.
You do not need to specify an assignee for this status.
Specify a button name (action) to use to move to the next status.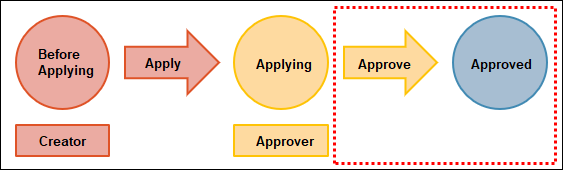 In the example above, the last action is "Approve" and the last status is "Approved".
Process details
Details of the process management should be set for each status.
Make a list of the statuses shown in your workflow visualization and write down the assignees, conditions, actions, and next statuses for each status.
Workflow visualization
Statuses and processes
Statuses
Before Applying, Applying, and Approved
Processes
| Status | Assignee | Condition | Action | Next status |
|---|---|---|---|---|
| Before Applying | Created by | Apply | Applying | |
| Applying | Approver | Approve | Approved |
The last (completed) status has no assignee or action, so its details do not need to be included in your list.